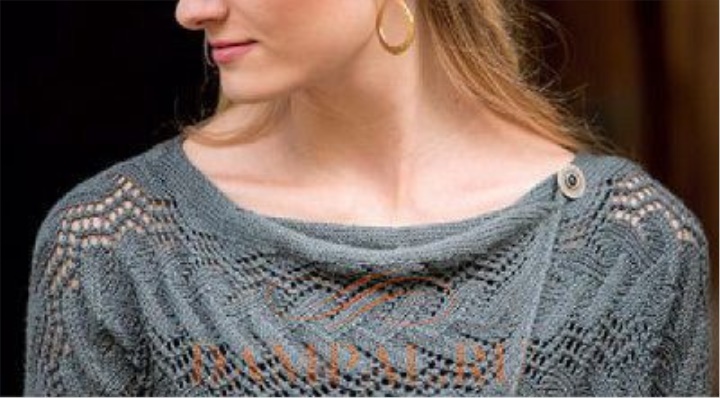
The openwork cardigan has an unconventional design and elegant drapery.
The description of the cardigan from the designer Romi Hill is translated from the magazine “The Knitter”.
The chest circumference of the finished product is 94 (106.5, 119.5, 132, 147.5) cm
The length of the sleeve is 42 (42.5, 43, 44.5, 47) cm.
Shibui Knits Staccato yarn (70% merino wool, 30: silk; 174 m / 50 grams in skein) - 7 (8, 10, 11, 13) skeins, 2 buttons with a diameter of 2 cm, 3 buttons with a diameter of 1.5 cm.
Circular needles No. 3.25 and No. 3.5, 40 cm long, circular needles No. 3.25 and No. 3.5, 60 or 80 cm long, set of double-pointed needles No. 3.25, needles No. 2.75, loop markers, auxiliary thread, loop holders, additional needle, tapestry needle.
24 loops and 32 rows = 10 cm of the front surface made of the needles No. 3.5;
20.5 loops and 36.5 rows = 10 cm of Figure A-4, made with the needles No. 3.5.
2 face loops, * return 2 loops from the right knitting needle to the left needle, 2 loops knit together the front one for the back walls, 1 face loop; repeat from * to the last 2 loops on the left knitting needle, knit 2 loops together on the front of the back wall, fasten the last loop.
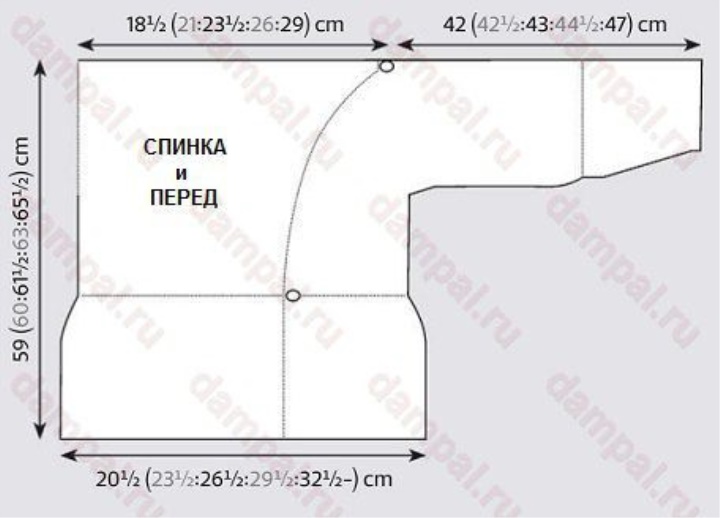
Remarks:
For this model, it is extremely important to tie the sample, since the openwork pattern increases after washing and steaming. Thus, the size will be different before and after the wet-heat treatment.
The removed loops along the edges during knitting of patterns from A-1 to A-3 and from F-1 to F-3 must be made sufficiently free, since they must be stretched during the steaming.
When using a marker to separate repeats of rapport, it is necessary in some cases to shift the markers before the first repetition and after the last repetition in accordance with the reductions made.
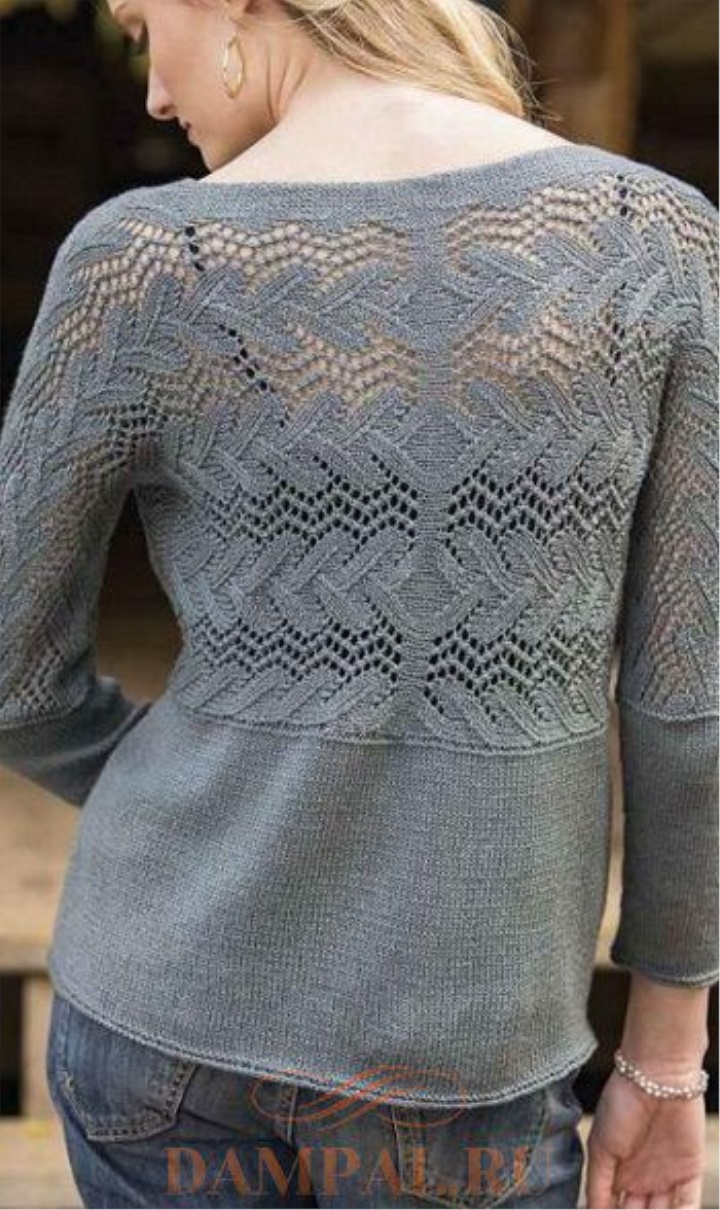
Right shelf:
Note: the right shelf runs from the top edge of the asymmetric buckle to the right side of the neckline.
Circular needles No. 3.5 dial 6 (6, 8, 8, 6) loops using the preliminary set of loops shown in the video tutorial.
At the same time leave the end of the thread with a length of 92 cm for the further implementation of the seam and buttonholes.
Work thread to tie 1 face row with facial loops.
Next row (purl): 3 purl loops, 1 nakid, purl loops to the end of the row - on the needles 7 (7, 9, 9, 7) loops.
To connect rows 1-36 of Figure A-1 - on the needles 49 (49, 51, 51, 49) loops.
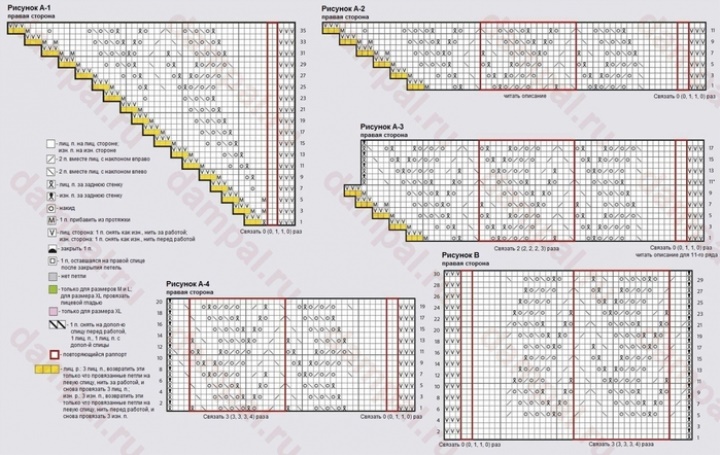
To connect rows 1-12 of Figure A-2, performing 1 time repeat rapport of 17 loops in the red frame - on the needles 66 (66, 68, 68, 66) loops.
Only for size 2XL:
Link rows 1-12 of Figure A-2 by performing 2 times a repeat of the repetition of 17 loops in the red frame - on the needles - (-, -, -, 83) loops.
For all sizes:
Link rows 1-10 of Figure A-3 - on the needles 79 (79, 81, 81, 96) loops.
A total of 60 (60, 60, 60, 72) rows are connected (including two rows before the first pattern). The size of the knitted fabric is approximately 16.5 (16.5, 16.5, 16.5, 20.5) cm from the dial-up row after steaming.
Knit the 11th row of Figure A-3 to the last 3 loops, transfer the last three loops to the auxiliary thread - on the needles of 76 (76, 78, 78, 93) loops.
Link rows 12-18 of Figure A-3.
Link 1 time rows 1-6 of Figure A-4
Link 3 times the rows 7-18 of Figure A-4.
Tie 1 time rows 19-20 of Figure A-4, finish on the right side of the eaglehole cutout.
The height of the knitted fabric is approximately 33 (31, 31, 31, 35) cm from the dial-up row after the steaming.
On the front side, remove the first 3 loops of the row (the edge of the neckline) on the auxiliary thread; move the remaining 73 (73, 75, 75, 90) loops to the spare circular needles or to the auxiliary thread.
Cut the thread, leaving an end of 30 cm to attach the loops of the neckline edge to the back in the future.
Right side of the back:
Note: the right side of the back is running from the middle of the back to the right along the neckline.
3. Use long circular knitting needles No. 3.5 to complete 76 (76, 78, 78, 93) loops using an auxiliary thread and a preliminary set of loops.
Tie a working thread 1 purl row purl loops.
Link 1 time rows 1-16 of picture B.
Link 2 times the rows 17-28 of figure B.
Tie 1 time rows 29-30 of picture B, finish on the right side of the neckline.
A total of 43 rows are connected (including the first purl row), the size of the knitted cloth is 12 cm from the dial-up row after steaming.
On the front side, transfer the extreme three loops of the neckline to the auxiliary thread - 73 (73, 75, 75, 90) loops are left on the needles.
Right shoulder and sleeve:
Link the 1st row of Figure C, connecting the right side of the back and the right shelf: link the first 72 (72, 74, 74, 89) loops on the right side of the back, temporarily remove the last loop on the right needle, move 73 (73, 75, 75 , 90) loops of the right shelf with an auxiliary thread on the left needle, remove the last backrest loop from the right needle onto an additional needle before work, knit the front first loop of the right shelf, knit the front last loop of the back with an auxiliary needle, tie the remaining 72 patterns (72, 74 , 74, 89) loops - just 146 (146, 150, 150, 180 ) loops.

Link 2nd row of figure C.
Link the 3rd row of the picture C, removing 2 loops in the center, as shown in the diagram - just the needles 144 (144, 148, 148, 178) loops.
Link 1 time rows 4-10 of figure C.
To connect 2 (3, 4, 5, 6) times rows 11-22 of figure C.
A total of 34 (46, 58, 70, 82) rows from the end of the neckline are connected.
Note: use picture D for sizes S and 2XL; use picture D-1 for sizes M, L and XL.
When performing pattern D-1 for sizes M and L, knit loops in the green cells and all the loops between them, skipping the loops in the pink cells. When performing pattern D-1 for size XL, knit all the loops, including the loops in the pink cells and in the green cells.
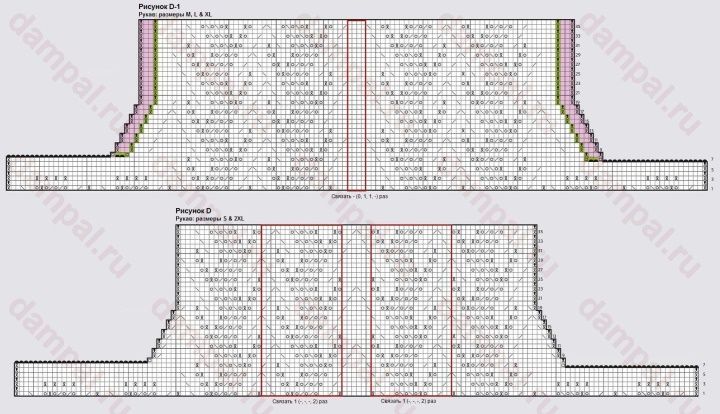
Assign 1-6 pattern D (D-1) for the selected size.
A total of 40 (52, 64, 76, 88) rows from the end of the neckline are connected. The height of knitting is 11.5 (14.5, 18, 21, 25) cm after the steaming.
Close the hinges for the sides in the following 2 rows:
7th row (front): close 28 (25, 25, 22, 28) loops, knit to the end of the row - on the needles 116 (119, 123, 126, 150) loops.
8th row (purl): close 28 (25, 25, 22, 28) loops, knit to the end of the row - on the needles 88 (94, 98, 104, 122) loops.
To connect the rows 9-36 of the picture D (D-1), performing a subtraction, as shown in the diagram - there are only 76 (82, 86, 92, 110) loops on the needles.
Link 4 times the rows 25-36 of pattern D (D-1).
Connected only 78 rows from a series of closure loops for the sides. Sleeve length is 21.5 cm after steaming.
Move all loops to the loop holder, do not cut the thread.
Left side of the back:
Note: the left side of the backrest runs from the middle of the back to the left side of the neckline.
Carefully peg off the auxiliary thread from the preliminary set of loops on the right side of the back and place the opened 76 (76, 78, 78, 93) loops on the long needles No. 3.5.
Link 1 time rows 1-16 of picture E.
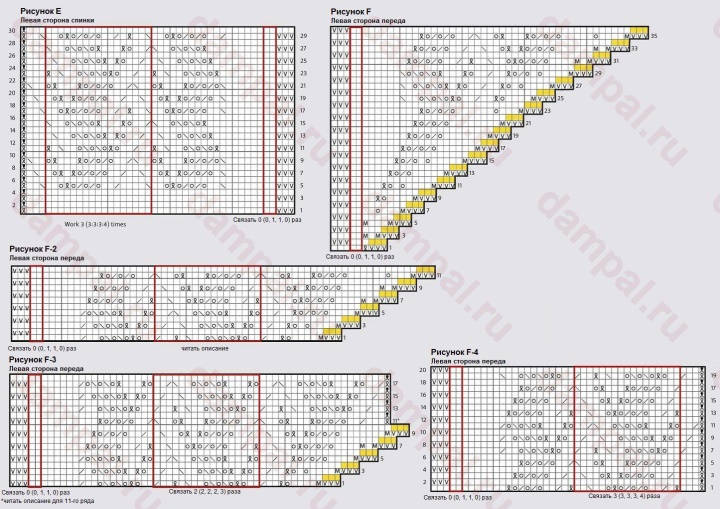
Link 2 times the rows 17-28 of figure E.
Tie 1 time rows 29-30 of picture E, finish on the left side of the neckline.
A total of 42 rows are connected, the size of the knitted cloth is 12 cm from the dial-up row after steaming.
On the front side, transfer the extreme three loops of the neckline to the auxiliary thread - 73 (73, 75, 75, 90) loops are left on the needles.
Cut the thread leaving an end 30 cm long to attach the loops of the neckline edge to the back in the future.
Left shelf:
Note: the left shelf runs from the top edge of the fastener (under the right shelf) to the left side of the neckline.
On the circular needles number 3.5 dial 6 (6, 8, 8, 6) loops, using a preliminary set of loops,
leaving the end of the thread with a length of 92 cm for the further implementation of the seam and buttonholes.
Work thread to tie 1 face row with facial loops.
Next row (purl): 3 (3, 5, 5, 3) purl loops, 1 nakid, purl loops to the end of the row - on the needles 7 (7, 9, 9, 7) loops.
Link rows 1-36 of the pattern F-1 - on the needles 49 (49, 51, 51, 49) loops.
To connect rows 1-12 of the F-2 pattern, performing 1 time repeat rapport of 17 loops in the red frame - on the needles 66 (66, 68, 68, 66) of loops.
Only for size 2XL:
Link rows 1-12 of the F-2 pattern by performing 2 times a repeat of the 17 loops in the red frame - on the needles - (-, -, -, 83) loops.
For all sizes:
Tie rows 1-10 of picture F-3 - on the needles 79 (79, 81, 81, 96) loops.
A total of 60 (60, 60, 60, 72) rows are connected (including two rows before the first pattern). The size of the knitted fabric is approximately 16.5 (16.5, 16.5, 16.5, 20.5) cm from the dial-up row after steaming.
Knit the 11th row of the F-3 pattern, having resembled the first three loops on the auxiliary thread - on the needles 76 (76, 78, 78, 93) of the loops.
Link rows 12-18 of Figure F-3.
Link 1 time rows 1-6 of Figure F-4
Link 2 times the rows 7-18 of Figure F-4; This is intentionally 1 repetition less than on the right shelf.
Tie 4 times the rows 19-20 of the F-4 pattern, finish on the left side of the neckline.
The height of the knitted fabric is approximately 28 (28, 28, 28, 31.5) cm from the dial-up row after the steaming.
On the front side, remove the last 3 loops of the row (edge of the neckline) on the auxiliary thread - 73 (73, 75, 75, 90) loops are left on the needles.
Left shoulder and sleeve:
Link the 1st row of Figure C, connecting the left shelf and the left side of the back: tie the first 72 (72, 74, 74, 89) loops of the left shelf by the pattern, temporarily remove the last loop on the right needle, move 73 (73, 75, 75, 90) loop the left side of the back with an auxiliary thread on the left needle, remove the last loop of the left shelf with the right needle onto an additional needle before work, knit the front first loop of the left side of the back, knit the front last loop of the left shelf with the auxiliary needle, tie the remaining 72 pattern ( 72, 74, 74, 89) loops - just sleep 146 ah (146, 150, 150, 180) loops.
Tie as the right shoulder and sleeve. On the needles 76 (82, 86, 92, 110) loops. Sleeve length is 21.5 cm from the row of hinge closures for the sides after stripping. Transfer all loops to the loop holder, do not cut the thread.
Binding neckline and buttonhole:
Remove the auxiliary thread from the 3 loops of the back and 3 loops of the shelf in the shoulder seam area and place these loops on separate double-pointed needles. Using a tapestry needle with a thread to connect the loop knit stitch shown in the video tutorial.
Repeat for the second shoulder.
Remove the auxiliary thread from the pre-set loop of the right shelf. Place the first 3 (3, 4, 4, 3) of these loops on the double-edged needle, move the remaining 3 (3, 4, 4, 3) loops to the loop holder.
Attach the working thread on the front side and knit on 3 (3, 4, 4, 3) loops of the I-cord, as shown in the video tutorial
Knit the cord until its length is enough to make a buttonhole loop.
Bend the cord in the form of a button fastener and connect the open loops of the cord with knit stitching with 3 (3, 4, 4, 3) loops on the loop holder at the bottom of the buttonhole.
Remove the auxiliary thread from the pre-set loop of the left shelf. Place the opened loops on two double-edged knitting needles with 3 (3, 4, 4, 3) loops each. Connect these loops with each other knit stitch.
Bottom Edge:
Scrap openwork details.
Place 76 (82, 86, 92, 110) loop of the sleeves on the short circular knitting needles No. 3.5.
Attach the working thread and tie 1 row with face loops, making the face loops behind the back wall above the backing of the last row of the openwork pattern.
Connect the ends of the row together and tie the last and the first loops of the row together front to the rear walls, connecting the loops in a circular row - on the spokes of 75 (81, 85, 91, 109) loops.
Place a marker at the beginning of a circular row.
The next circular row: purl loops up to the last 2 loops, 2 loops knit together in the purl - on the needles 74 (80, 84, 90, 108) loops.
Tie 9 circular rows straight face loops.
Circular row of reductions: 1 front loop, 2 loops knit together the front with a slope to the left, face loops to the last 3 loops, 2 loops knit together the front with a slope to the right, 1 face loop - 2 loops are lowered.
Repeat the last 10 rows for another 5 (5, 5, 6, 0) times - on the needles 62 (68, 72, 76, 106) loops.
Sleeve length is 19.5 (19.5, 19.5, 23, 4) cm from the last row of the openwork section.
Only for size 2XL:
Tie 7 circular rows straight face loops.
Circular row of reductions: 1 front loop, 2 loops knit together the front with a slope to the left, face loops to the last 3 loops, 2 loops knit together the front with a slope to the right, 1 face loop - 2 loops are lowered.
Repeat the last 8 rows 7 more times - on the needles - (-, -, -, 90) loops.
Jump on the short circular needles number 3.25.
[Repeat a circular row of reductions, tie 1 circular row straight] - 2 times - on the needles - (-,
-, -, 86) loops.
For all sizes:
If necessary, knit straight until the sleeve length reaches 19.5 (20.5, 21, 22, 25.5) cm from the last row of the openwork section.
Tie 1 circular row with purl loops, then tie 2 circular rows with face loops.
Sleeve length should be 20.5 (21, 21.5, 23, 25.5) cm from the last row of the openwork section.
Knitting needles number 2.75 close all loops elastic closure loops.
Bottom edge:
Run the side seams of openwork sections, grabbing the loop completely with a needle (both walls) so that the hem does not appear on the front side.
Turn the knitting neck down. Remove the auxiliary thread from the 3 loops in the corner of the left shelf (3 loops were removed on the auxiliary thread in the 11th row of Figure F-3), and place these 3 loops on the long circular needles No. 3.5. Attach the working thread on the front side. Tie 3 face loops, return 3 loops that were just connected to the left knitting needle, thread by loops, again knit 3 face loops.
Note: dial the loop on the side edge of the knitting should be, grabbing both walls of the loop, so as not to form a hem on the front side.
Continuing knitting after 3 loops, dial and knit facial 60 (69, 78, 87, 96) loops along the bottom edge of the left shelf; 123 (141, 159, 177, 195) loops along the lower edge of the back and 70 (79, 88, 97, 106) loops along the lower edge of the right shelf, then transfer 3 loops from the corner of the right shelf to the left needle (3 loops were removed on auxiliary thread in the 11th row of Figure A-3), knit 3 front loops, return the 3 loops that were just connected to the left knitting needle, thread after loops, again knit 3 face loops - just 259 needles (295, 331, 367, 403 ) loops.
Leaving the rest of the loops on the knitting needles, tie the I-cord on 3 loops to make a button loop from it, as was done before. The second end of the cord will be fixed later.
Next row (purl): 1 loop to remove, thread in front of the loop, 2 purl loops, * 1 front loop behind the back wall; repeat from * to the last 3 loops, 3 purl loops.
Next row (front): remove 3 loops, thread after loops, face loops to the end of the row.
Next row: 1 loop to remove, thread in front of the loop, purl loop to the end of the row.
Repeat the last two rows until the height of the knitting reaches 22 (23.5, 23.5, 25, 20.5) cm from the set of loops, finish with the front row.
Note: the largest size has the deepest armhole, so the lower section is slightly shorter.
Change the spokes on the long circular number 3.25.
1st row (purl): 3 loop to remove, thread in front of the loop, face loops to the last 3 loops, 3 purl loops.
2nd row (front): 3 loops to remove, thread for loops, facial loops to the end of the row.
3rd row: remove 2 loop, thread in front of the loop, purl loop to the end of the row.
The height of knitting is 23 (24, 24, 25.5, 21) cm from the set of loops.
On the front side, close all loops with elastic loops.
Completion:
Sew the second end of the I-cord to the right shelf below the set of loops to get the second buttonhole.
Scrub the lower sections. If necessary, re-steam openwork sections.
Buttons:
Align all the knitting on the sides. The right shelf to impose on the left shelf.
Mark the place where button loops are superimposed on the left shelf, and where the upper corner of the left shelf touches the wrong side of the right shelf.
Sew 1 small button to the seamy side of the right shelf at the very neckline; the hole formed by the first nakida on the corner of the left shelf will serve as a loop for this button.
Sew large buttons to the marked places on the front side of the left shelf. Then sew small buttons to the seamy side of the left shelf under the big buttons.
Thread the ends of the threads. Finally otparit openwork cardigan.